Monday, November 22, 2010

OMG! It's Caramel!

After enjoying an incredible caramel-and-chocolate-dipped salty hard pretzel at a friend's wedding last weekend, we talked about trying to replicate the insane delicious-ness at home.
This would of course involve making my own caramel, something that was a complete mystery to me. I found a well-reviewed recipe online and got to work.
I did not make any modifications to this recipe for my first try, although my thermometer never actually got to a reading 250F...I think that I got to only about 235F. You can see how much the mixture changed color and consistency during the hour or so that it was cooking.

There were lots of good suggestions in the reviews of this recipe. Because of the variability of thermometers, someone recommended the old practice of drizzling a spoonful into a glass of cold water to check the consistency-- there is a wide range of potential results...think caramel sauce vs. hard Werther's candies.
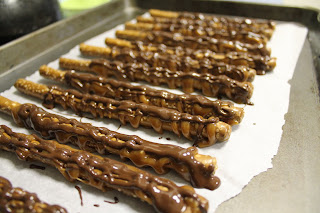
Once the mixture was perfect, I drizzled some caramel across rows of small (see above) and large rod pretzels. When the caramel had cooled, I added a little of the most amazing chocolate (E. Guittard semi-sweet wafers) courtesy of Craig. Thank you!
Once I used what I wanted for the hard pretzels, I poured the rest of the caramel into a glass Pyrex pan lined in parchment paper. When the slab was cool, we cut it up and wrapped each piece in a little square of parchment paper.
Each piece is a salty-sweet browned-butter nugget of heaven!
Y U M!

Sunday, October 31, 2010

Finger Cake

What could possibly turn a pretty white cake into a icky Halloween cake?
Funny you should ask!
I think that these rubber severed fingers did just the trick!


Halloween Cookies


Some bright-colored sugar cookies for Halloween--the dough and the glaze are all different colors :)


Elmo Cake

Scott and I put this cute little Elmo cake together for a friend.
I think that the best part is the fondant-cut out letters in the name!


Saturday, September 11, 2010

Wedding Cookies

We made cookies for our friends' wedding!
The bride's mom had the idea to do a "cookie tower" instead of cake or cupcakes, and it was such a blast to be a part of making their wedding as special as it was.
We'll show some of the process steps later, but here is the finished tower with cookies (we baked a total of 950 cookies!):

We made three kinds of cookies, and decorated a purchased cardboard structure found online here. Since the idea was to make the tower look like a cake, we covered all of the tiers in a nice white fabric and edged them with a pretty green ric-rac.


We made Coconut Macaroons, Mexican Wedding Cookies, and glazed Sugar Cookies.

Coconut Macaroons
The Coconut Macaroons are a long time favorite. Here's our recipe!


Mexican Wedding Cookies
We made this Mexican Wedding Cookie recipe, but we used pecans instead of almonds. Also, we did not put any nuts on the outside of the cookies. We toasted the pecans a few days before of the actual baking so that we could get ahead a bit. We also ground up the nuts and prepped the dry ingredients (below right). Each of the 5 bags is 2 batches of cookies--10 batches in total! Scott very patiently scooped all of the cookies using a little hemisphere cookie scoop lined with plastic wrap so that the cookies would be the same size and shape and bake consistently.


Sugar Cookies
The Cut-out Sugar Cookie recipe is my great-grandmother's recipe:


Ingredients: (makes about 30 2 1/2" cookies)

  • 3 1/2 cups flour
  • 3/4 teaspoon salt
  • 2 teaspoons baking powder
  • 1 cup (2 sticks) butter
  • 2 cups sugar
  • 2 eggs
  • 2 tablespoons milk
  • 1 teaspoon vanilla
  • 1 teaspoon grated lemon rind


Directions:

  1. Cream butter and sugar til fluffy. Add 2 eggs, vanilla, and milk.
  2. Add the flour, salt, and baking powder. Mix well.
  3. Roll into 2 or 3 balls and wrap in plastic wrap. Refrigerate for about an hour.
  4. Roll out on a floured board, cut into desired shapes.
  5. Bake at 375F for approximately 8 minutes on parchment paper or silicone mats.

Here is our fridge with the vegetable drawer completely filled with sugar cookie dough:
Thanks to Shelby for this AWESOME rolling pin with adjustable thickness--helped us make all of the cookies perfectly consistent--which ensured that they all baked to the same golden brown. Thank you!


The workhorse (couldn't have done it without this guy, thanks Helene!):

Sunday, August 29, 2010

German pretzels V3.0

Ingredients: (makes 7-19 pretzels, depending on who rolls them out!)

  • 1 tablespoon yeast
  • 2 teaspoons sugar
  • ¼ cup warm water
  • 4 1/4 cup bread flour
  • 1 cup warm water
  • 2 teaspoons salt
  • 2 1/2 tablespoons salted butter
  • Plastic gloves and goggles for handling the lye
  • 1 oz. food-grade lye, dissolved in 1 quart of water
  • Salt (large flakes like sea or Kosher salt are best)


Directions:

  1. Dissolve 1 tablespoon yeast and 2 teaspoons sugar in ¼ cup warm water. Let sit (proof) for 5 minutes.
  2. Measure the bread flour into a mixing bowl (I use my KitchenAid stand mixer). Add salt, 1 cup of warm water, and the proofed yeast.
  3. Mix by hand or with the dough hook until the dough comes together in a stiff ball. Add water (slowly) if needed to get the dough to form.
  4. Knead for 5 minutes (either by hand or with the dough hook). Add the butter and knead again for at least 5 more minutes, until butter is incorporated. I find that I need to keep an eye on the stand mixer to help get the butter into the dough—I’ll use a knife every now and then to cut the dough off the hook to help force the butter in. When done, the dough should be firm and soft, velvety to the touch.
  5. Form the dough into a ball, place into a buttered bowl. Cover and let rise until doubles, about 1 hour in a warm spot.
  6. Degas the dough (punch down) and divide into 2 ounce pieces (or use more dough per ball to make larger pretzels). Form into balls. Using very little flour, form balls into 1-foot long strands, thicker in the middle and tapering towards the ends.
  7. Take each strand and roll out again to form 2-foot strands. Twist into pretzel shape, using a little water again to make the ends stick to the loop.
  8. Place the formed pretzels on a baking sheet lined with parchment paper or a silicone baking mat (which I love to use). Refrigerate for 1 hour to dry out the surface. This makes the pretzels easier to handle. (I did an experiment last night where I left half of a batch in the fridge overnight and baked them in the morning—this gives a bit of flexibility with the baking timing—and they still came out great!)
  9. Make the lye solution: BE VERY CAREFUL! (Wear goggles, gloves, and long sleeves if desired). Place 1 quart of water in a plastic or glass container, weigh 1 ounce of food grade or reagent grade sodium hydroxide into a bowl and add slowly to the water, stirring with a plastic spoon or similar object. ALWAYS ADD THE LYE TO THE WATER! Wipe up spills with paper towels and dispose immediately. Rinse with water or vinegar. Rinse all utensils and gloves with large amounts of water and wash arms and hands after working with the solution. If you feel anything burning on the skin, rewash with soap and water, rinse and dry.
  10. Remove the baking sheets from the refrigerator and dip each pretzel for 30 seconds in the lye solution. Remove with a slotted spoon, drip dry, and place back lined baking sheet.
  11. Sprinkle pretzels generously with salt. If desired, cut into the thick curve of the pretzel with a razor blade (I haven’t tried this yet, but it gives the pretzels a traditional look). Let the pretzels rest for 15 minutes.
  12. Heat oven to 375°F. Bake pretzels for 20-25 minutes, or until deep golden brown.

Dispose of lye solution according to county and state hazardous waste regulations. This might include dilution of the solution with water, neutralization with an acid and subsequent dilution, or taking the waste to a disposal facility. I have been keeping the lye solution in a sealed HDPE container with a label indicating that it is lye.

This recipe is based on this one, and is reformatted for ease of use.

Sunday, August 15, 2010

German pretzels V2.0

Scott took the helm of the pretzel rolling last night...
The dough DID turn out a lot better than the first batch last week, but he was also much more patient than I had been--from the same amount of dough that I made into 7 pretzels last week, his rolling yielded 19!
One tray of Scott's perfect pretzels before baking

Perfectly golden after baking and ready to eat! Yay mustard!

Cute Little Kid Cake

A fun cake for a 3 y.o. little boy.
I needed to incorporate the Toy Story figures, so I made a fairly simple and bright cake as a backdrop. His name is spelled out on "toy block" fondant squares.

Chocolate Ganache Cake

This chocolate ganache and purple buttermilk buttercream covered chocolate cake was a big hit for a wedding send-off for a coworker. I think that this was the first time making a tiered cake that we actually iced the top smaller tier before stacking it onto the larger base. While it was a bit stressful to just DROP the tier onto the bottom of the cake, it was MUCH easier to ice everything nice and smoothly.
The teeny cake was for her to take home to her fiance :)

Wednesday, August 11, 2010

German pretzels!

I was inspired by a friend to try making German pretzels, so I looked up a recipe, gathered the necessary ingredients
(most notably
LYE, for a post-rise dip), and made a batch tonight.
My pretzel forming technique could use a little work,
but they were tasty and had a great texture!


This was the best-looking pretzel of the group.


After rising, the pretzels are supposed to get dipped in a lye solution. Apparently the lye goes through a chemical reaction with the pretzel ingredients to give the pretzels the sweet and crusty outer layer that is expected for this type of German pretzel.
Careful with the lye, though, as it can cause serious skin/eye damage!

Sunday, April 4, 2010

Coconut Macaroons

These are a SOOO good!

Ingredients: (makes about 3 dozen macaroons)
  • 6 egg whites
  • 1 7 oz. tube of Almond Paste
  • 14 oz. sweetened flaked coconut
  • 8 oz. unsweetened finely grated coconut
  • 2 teaspoons vanilla
  • 1 1/3 cup extra fine granulated sugar
  • chocolate (optional)

Directions:

  1. Preheat to oven to 325°F. Line cookie sheets with parchment paper or silicone baking mats.
  2. With a mixer beat the egg whites until frothy and white. Add the vanilla and beat until egg whites hold a peak but are not stiff or dry. Use a rubber spatula to scrape the egg whites into another large bowl.
  3. Grate the almond paste using a box grater or food processor (this is easier when it is cold)
  4. In a separate bowl beat the grated Almond Paste and sugar until it has the texture of small crumbs. Add both kinds of coconut to the almond and sugar crumbs, and mix.
  5. Add coconut mixture to egg whites. Using a rubber spatula, fold together until all ingredients are mixed together. It will be moist and sticky.
  6. Chocolate can be added to the macaroons in many different ways, if desired. I like to chop milk and bittersweet chocolate chips in the food processor and add the chopped bits the mixture at this point.
  7. I like to use my hands to form balls of dough about 1" diameter 2 inches apart on cookie sheets. You need to firmly pack the coconut, but don’t squeeze TOO hard!
  8. Baking time depends a lot on cookie size and desired brownness. Generally I start with baking cookies for about 20 minutes, but I usually end up adding several minutes, in short increments to get the cookies to the look that I like.
  9. Place cookie sheets on wire racks to cool cookies. Allow the cookies to cool nearly completely before trying to move them.
  10. If you prefer to add chocolate as a decorative component, decorate with drizzles of melted chocolate once the cookies are completely cool. Store in cookie tins or plastic containers between layers of wax paper for one week.


The darker cookies on the right have chopped milk and bittersweet chocolate in them:


Leaning Tower of Cake

Normally when I make cake, I bake the cakes on one night, and then assemble and frost them the next night. This is to ensure that the cakes are all the way cooled through, and I think that the extra day helps them to dry out a bit--which is a good thing.

Last week I made a cake as a thank you and got a bit crunched on that extra baking day. So I baked the cakes and *thought* that I had given them plenty of time to cool... it turns out that I hadn't, and the cake was so moist and soft too. As I iced the outside of the cake, it just kept shifting and sliding.

Long story short, I ended up with the cake below in my efforts to exaggerate the failure so that it didn't just look BAD. The resulting leaning tower of cake was actually quite stable.


Baby Shower Cake


A cake for a baby shower at work.
Cutout marzipan letters spell out "Welcome Rivers".


(You can't really tell from this picture, but this cake is HUGE!! 12" Diameter, probably 6+" tall!)

Friday, January 29, 2010

Orange and Green Dotty Cake

Just playing around with fun colors and patterns (and the piping bag, of course!).


Cucumber-looking Carrot Cake

I had a random idea to make a carrot cake that looks like a slice of cucumber...
I tried to "paint" with the cream cheese icing, but would have probably had better luck with cutouts of rolled marzipan...next time!


No Knead Bread

After my trip to Blair's Elmore Mountain Bread bakery, I wanted to try out what I hoped would be a similar type of bread. I had made some bread a few years ago that was similar, but I've since been having such luck with this:
No Knead Bread Recipe
And you can definitely play around with the ingredients- adding whole wheat flour, milled flax seed, etc. Very tasty!